In the process of cold rolling, the broken strip of steel plate will cause rolling interruption, which is easy to cause the surface scratch of rolling roll, damage cold rolling mill, serious roll peeling failure, affect the normal production and operation of the unit, and increase the rolling cost.
A cold rolling plant in China has six 6-high reversible cold rolling mills with a maximum thickness of 0.15mm and a width range of 750-1550 mm. Recently, when the cold rolled sheet made of SPCC was produced, there was a broken strip accident in the process of the third pass of rolling. The deformation of the third pass was 1.76 ~ 1.34mm, the rolling pressure was 8.2MN, the inlet tension was 140 KN, the outlet tension was 130 KN, and the speed was 800 m/min. The samples of broken rolling strip were sampled and analyzed on site.
1. Test Method
The broken band samples were analyzed macroscopically, and the metallographic samples were intercepted and detected by GX51 metallographic microscope. The hardness of steel plate was tested by Vickers hardness tester. The thickness of each part of the sample was measured by digital outside micrometer.
2. Test Results
2.1 Macroscopic detection
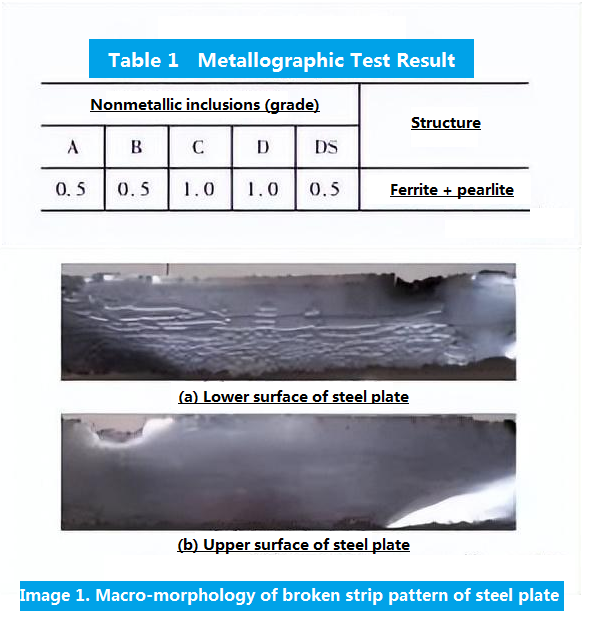
The macroscopic detection found that there were dense and irregular indentation on one side of the broken belt of the steel plate, there were normal plate rolling patterns at the bottom of the indentation, there were irregular transverse stripes on the high protruding part of the indentation area, and the other side surface was relatively smooth and flat. After investigation, it is found that the side with indentation is the lower surface of the steel plate rolling process, and the smooth and flat side is the upper surface of the steel plate rolling process.
2.2 Metallographic Analysis
The results of metallographic detection are shown in Table 1. It can be seen that the nonmetallic inclusions and microstructure in the matrix of the sample are basically normal.

The metallographic test diagram is shown in Image 1. The observation shows that the plastic deformation flow line of the tissue is relatively dense in the part with low indentation area, while the plastic deformation flow line density of the tissue is relatively small in the part with high indentation area. In other words, the steel plate deformation is large in the part with low indentation area, while the steel plate deformation is relatively small in the part with high indentation area. The thickness of the steel plate with high indentation is 1.61 mm, while the thickness of the steel plate with low indentation is only 0.97 mm.
2.3 Hardness Testing
The hardness test results are shown in Table 2.
Table 2 Hardness Test Results
Test Point | 1 | 2 | 3 | 4 | 5 | 6 | AVG |
Hardness HV | 191 | 187 | 182 | 196 | 181 | 185 | 187 |
According to the hardness test results in Table 2, after two passes of cold rolling, the average hardness of the material is 187HV, indicating that the hardness of the material is basically normal.
2.4. Thickness Detection
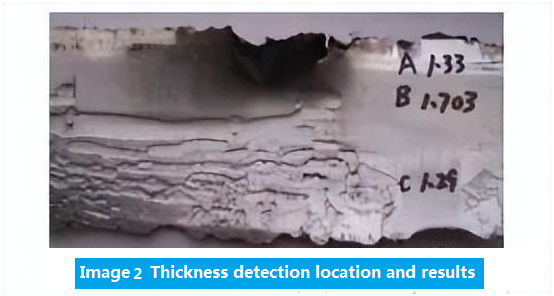
The location and results of thickness detection are shown in Image 2.

As can be seen from Image 2, the thickness of point A is 1.33mm, point B is 1.703mm, and point C is 1.29mm.
3. Reason Analysis
3.1 Reasons for broken belt accidents
Metallographic detection of non-metallic inclusions, microstructure and hardness of materials in the material matrix are basically normal, indicating that the fault has nothing to do with non-metallic inclusions and microstructure in the raw material matrix. The third rolling inlet tension is 140kN, the outlet tension is 130kN, the tension is relatively large, the thickness test found that the steel plate thickness is thin, and the surface of the steel plate is not smooth, there is indentation, resulting in the increase of friction force, so the steel plate rolling speed is reduced instantaneously, the tension is increased instantaneously, resulting in broken belt accident.
3.2 Causes of Indentation
According to the thickness measurement, the thickness of point A is 1.33mm and that of point B is 1.03mm. The third pass deformation is from 1.76 to 1.34mm, and the target thickness is 1.34mm. Therefore, it can be determined that the transverse direction along point A is the position of the third pass roll crack. The indentation defect at point B and nearby did not pass through the third roll gap, indicating that the indentation defect existed before the third roll. The thickness of point C is 1.29mm, which has not been rolled through the third pass, but its thickness is much less than the target thickness of the second pass and thinner than the target thickness of the third pass. The thinning of steel plate is caused by the increase of rolling force in the rolling process. Because the elastic deformation of the roll surface is different, the rolling force suddenly increases, and the roll can not bear it, which affects the smooth roll surface and causes indentation on the steel plate surface. As the rolling force is controlled by the AGC hydraulic computer control system, the sudden increase of the rolling force is caused by the instantaneous failure of the electronic control system. Due to the instantaneous failure of the electronic control system, the sudden increase of rolling force affects the roll surface formation and produces indentation defects.
Through the above analysis, it is concluded that the possibility of indentation defects on the steel plate surface caused by foreign body impingement is small, but it cannot be completely ruled out.
4. Conclusion of Moran
(1) The belt breaking accident is caused by the indentation defect on the surface of the cold rolling steel plate.
(2) The indentation defect is caused by the instantaneous failure of the electronic control system, which leads to the sudden increase of rolling force and affects the roll surface flatness.


 WhatsApp